Graph Editor
Intro
The Graph Editor can be used to edit Keyframes and their resulting animation curves. An animation curve is the line drawn between Keyframes to represent the speed in which the Keyframe values change — also known as 'interpolation'. This can be adjusted by manipulating the handles of a Keyframe to create more natural movement using easing.
Previewing procedural animation curves is also supported. For example, if a Noise Behaviour is connected to position.x of a Shape, the resulting animation curve can be shown in the Graph Editor.
UI
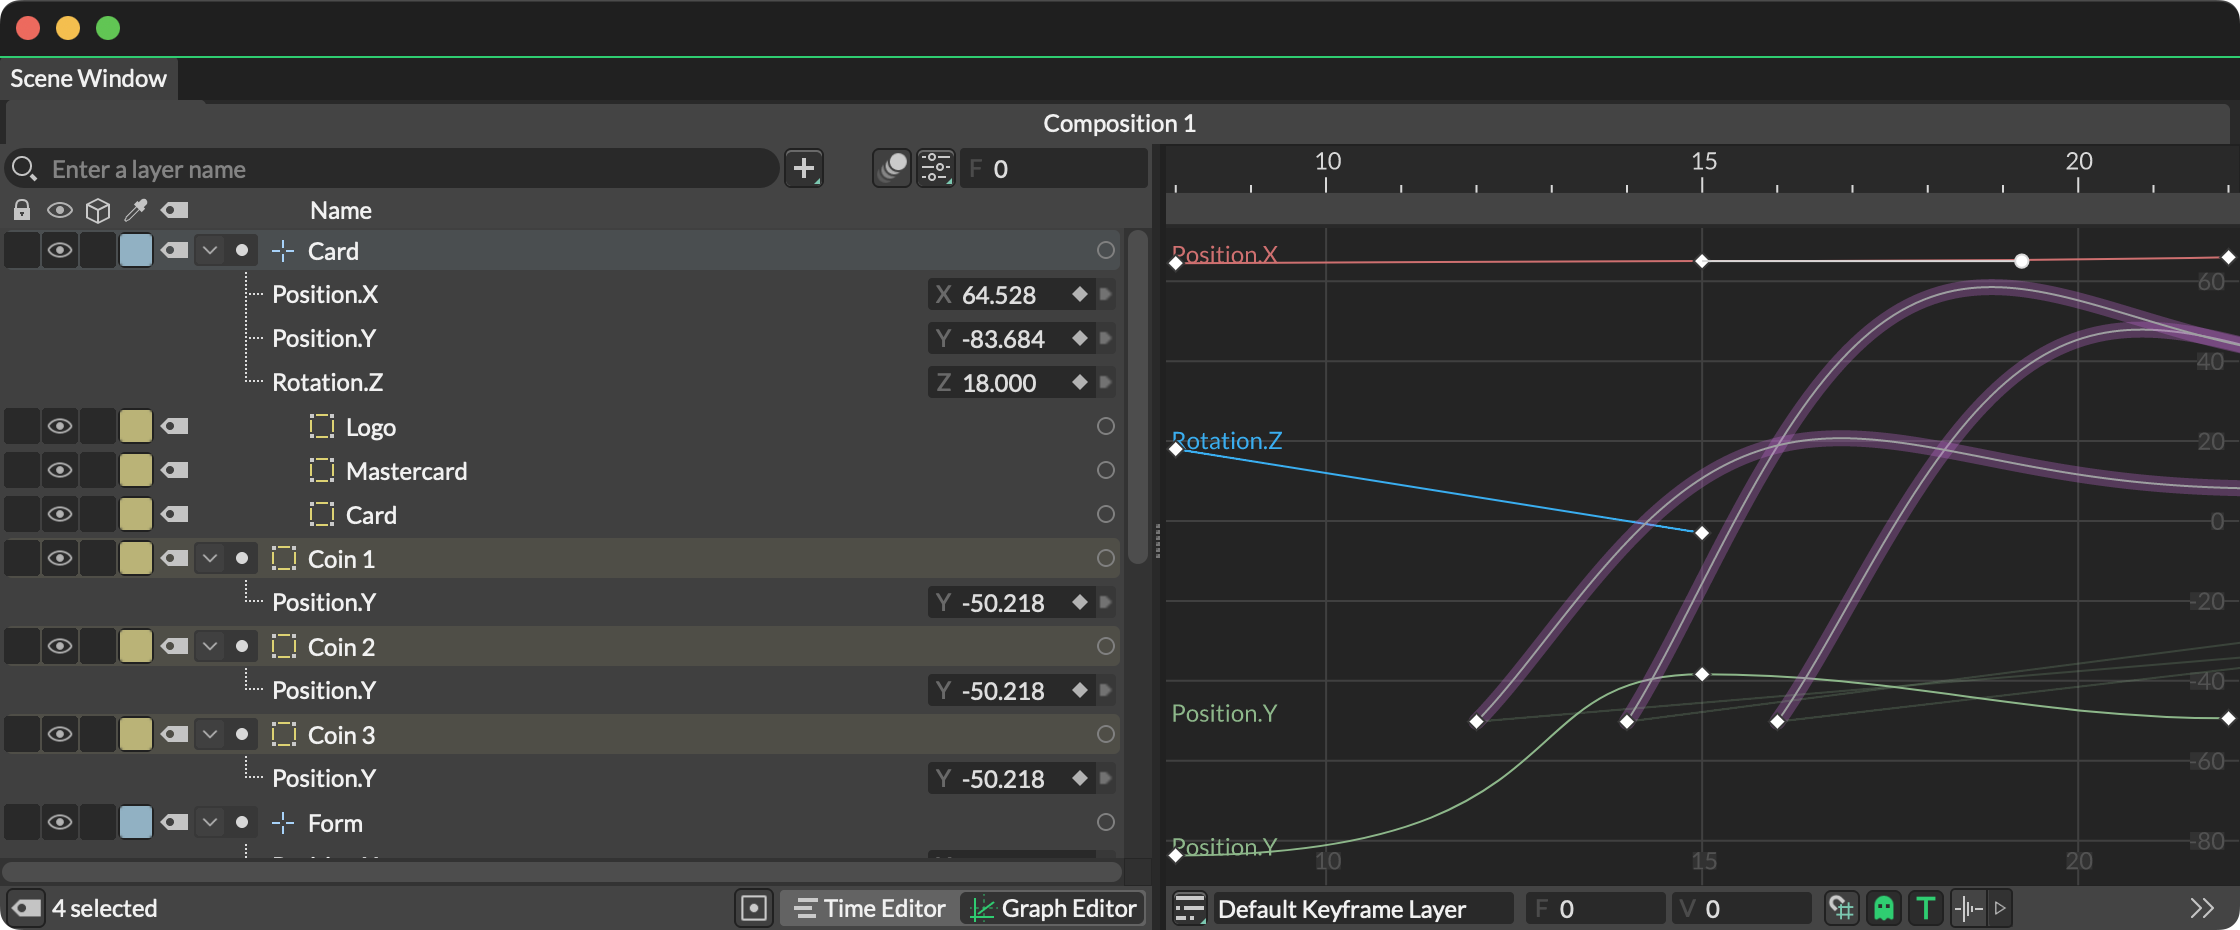
Adjusting Animation Curves
To load Keyframes and their animation curves into the Graph Editor either:
- Select a Layer or Layers in the Scene Tree - this will load all animated Attributes.
- Select an Attribute or Attributes in the Scene Tree - this will load all selected animated Attributes.
- Select a Keyframe or Keyframes in the Time Editor - this will load all the Attributes associated with the selected Keyframe(s) when switching to the Graph Editor.
Once animated Attributes are loaded into the Graph Editor, select the Keyframes to adjust them.
- Move Keyframes up/down to increase/decrease their value.
- Move Keyframes left/right to move them backward/forward in time.
To reveal bézier handles, select a Keyframe(s) or an animation curve.
The animation curve can be adjusted by manipulating a Keyframe's bézier handles. Keyframe's have 3 basic interpolations (or states):
- Linear - The resulting animation curve is a straight line representing a uniform rate of change between two Keyframes.
- Bézier - The resulting animation curve is a curved line representing a smooth rate of change between two Keyframes. Bézier keyframes can be used to ease in and out of values.
- Step - The resulting animation curve is an L shape representing no change of values between Keyframes. Also know as 'hold' keyframes, values jump abruptly as the playhead reaches each Keyframe.
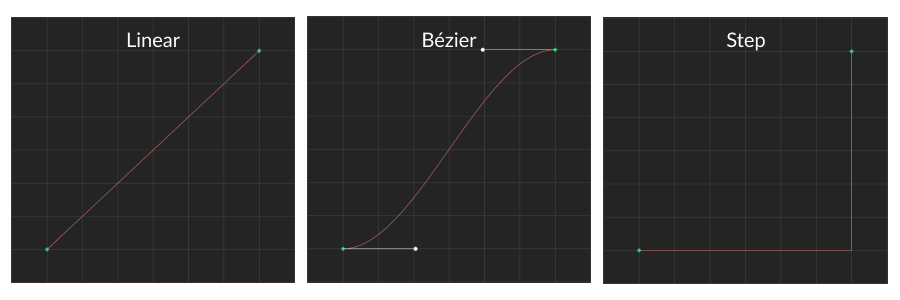
To change the interpolation of Keyframes either:
- Select a Keyframe or Keyframes > right click > Key Interpolation and then choose an option.
- Select an animation curve or curves > right click > Curve Interpolation and then choose an option (this will convert all keyframes on the animation curve(s)).
Bézier Keyframes display handles in the Graph Editor. Moving the handles will manipulate the animation curve. See the shortcuts below for how to interact with handles.
Double clicking a keyframe will pop up a window with options to set a keyframes properties inline.
- Value - Set the attribute's value for the keyframe.
- Interpolation - Set the interpolation for the keyframe.
- Magic Easing - Select an option for Magic Easing.
- Bézier Handle Positions - Set the positions for the keyframes bézier handles. These can be absolute or relative via the Use Absolute Bezier Positions preference.
- Angle Locking - When a keyframe's Interpolation is set to Bézier, when checked, changing the angle of one handle will be mirrored by the other handle.
- Weight Locking - When a keyframe's Interpolation is set to Bézier, when checked, adjusting the length of one handle will proportionally affect the length of the other.
Shortcuts
| Hotkey | Command |
|---|---|
| Option/Alt + click a keyframe | Toggle between linear and bezier interpolation. |
| Option/Alt + click + drag a linear keyframe | Convert the keyframe to bezier. |
| Option/Alt + click + drag a joined handle | Convert a joined handle to a broken handle. |
| Option/Alt + click + drag a broken handle | Convert a broken handle to a joined handle (and unify weights). |
| Shift + Option/Alt + drag a handle | Change the weights on joined tangents. |
| X + click a handle | Collapse (remove) the handle. |
| X + click + drag a collapsed handle | Restore a collapsed handle. |
| Shift + drag a keyframe/ handle | Constrain the move horizontally. |
| Scroll | Zoom the Graph Editor. |
| Option/Alt + scroll | Zoom the Graph Editor horizontally. |
| Shift + scroll | Zoom the Graph Editor vertically. |
| Option/Alt + click + drag | Zoom the Graph Editor horizontally and/or vertically. |
| Z + click + drag | Zoom the Graph Editor horizontally and/or vertically. |
| F | Zoom the Graph Editor to frame the selection or, with nothing selected, the Playback Range. |
| Cmd/Ctrl + F | Fit the visible animation curves. |
| Shift + F | With nothing selected, zoom the Graph Editor to the Frame Range. |
| Space + drag | Pan the Graph Editor. |
| Double-click an animation curve | Add a keyframe. |
| Option/Alt + Double-click an animation curve | Open the Loop Settings... window. |
Double click a curve to add a keyframe along the animation curve.
Looping
To set looping on an animation curve, select a curve or curves and right click to bring up the contextual menu. Choose from:
- Loop Settings... - Opening the Loop Settings reveal the following options:
- Mode - See below.
- Limit Loops - When checked, specify the number of times the animation curve should loop (in addition to the initial animation curve).
- Filter Last Keyframes - When checked, the loop can be limited to a specified number of keyframes. For example, a value of
2will play through the full animation curve and then loop just the last 2 keyframes. Note that an animation curve must include a minimum of 3 keyframes.
- Loop After - Looping will occur after the last keyframe:
- None - Don't loop.
- Looping - Start the loop at the value of the first keyframe.
- Looping with Offset - Start the loop at the value of the last keyframe.
- Oscillate - Ping pong between the first and last keyframes.
- Loop Before - Looping will occur before the first keyframe:
- None - Don't loop.
- Looping - Start the loop at the value of the first keyframe
- Looping with Offset - Start the loop at the value of the last keyframe.
- Oscillate - Ping pong between the first and last keyframes.
The buttons in the Toolbar at the bottom of the window can also be used.
Holding Option/Alt + double-clicking an animation curve will also open the Loop Settings... window.
Procedural Animation Curves
Where a Shape's animation is being driven by another Layer, its inherited animation curve can also be previewed in the Graph Editor. For example, if a Noise Behaviour is connected to a Shape's Position, selecting that Shape in the Graph Editor will preview its animation curve.
This is also true of Animation Offsets.
Tools
Keyframe Layers
See Keyframe Layers.
Keyframe Values
Frame - With a Keyframe(s) selected, set the frame number for that Keyframe(s).
Value - With a Keyframe(s) selected, set the value for that Keyframe(s).
Transform tool
The Transform tool can be used to move and scale selections of keyframes. With the tool active, a green area will appear around any selected keyframes. Click + drag:
- The middle of the green area to move the selection.
- An edge of the green area to horizontally or vertically scale the keyframes.
- A corner of the green area to scale the keyframes both horizontally and vertically.
Hold Option/Alt when scaling from an edge to scale the keyframes from the centre of the green area.
Grid Snapping
When checked, keyframes will snap to the defined increments. Use the checkbox to enable and set the size of the grid.
Ghosting
When enabled, a faint line will be drawn whenever adjustments are made to keyframes or handles showing where the animation curve was.
Draw Channel Names
When enabled, attribute names will be displayed on the left side of the Graph Editor.
Pacing Markers
Add guides to indicate seconds or audio beats. Toggle the button to enable/disable them or use the arrow to open a disclosure window containing the following options:
Mode - Select a mode:
- Seconds - Add Pace Markers on each second.
- Beats per Minute - Add Pace Markers based on a BPM.
Divisions - When Mode is set to Seconds, determine how many sub-steps to add between seconds.
Beats per Minute - When Mode is set to Beats pre Minute, set the BPM for the audio track. Grey guides represent Beats with the blue guides marking the Bars.
Offset - When Mode is set to Beats per Minute, move the markers forward or backward in time.
Beats per Bar - When Mode is set to Beats per Minute, set the number of beats in each bar.
Looping
See above.
Buffer
By saving a buffer, animation curves can be saved and reverted to at a later time. This is useful when experimenting with timing and easing for animation.
- Snapshot Buffer Curve - Save the selected animation curves to a buffer.
- Swap Buffer Curve - Where a buffer has already been saved for the selected animation curves, toggle between the saved buffer and any recent changes to those curves.
Interpolation
Set the interpolation of the animation curve between keyframes:
- Linear - A straight line between neighbouring keyframes.
- Bézier - Draw bézier curves between keyframes where handles can be used to manually manipulate the shape of each curve.
- Stepped - The animation curve will hold the value of a keyframe and jump to the value of the next.
- Stepped Next - The animation curve will jump immediately to the value of the next keyframe and hold that value until the next keyframe.
- Auto-Bézier — Tangents are smooth between neighbours and automatically flatten at peaks and troughs so the curve never overshoots a keyed value.
- Plateau — The same as Auto-Bézier but with the constraint that the first and last Keyframes are forced flat. The strictest no-overshoot variant — guarantees that the maximum and minimum values along the curve are exactly at Keyframes.
- Spline (allows overshoot) — A smoother version of Auto-Bézier with no flattening meaning the curve can overshoot keyed values to maintain continuity. This allows the curve to pass slightly above or below two adjacent keyframe's values – useful when maximum smoothness is required.
- Clamped (allows overshoot) — Similar to Spline, except a tangent flattens to linear when a keyframe's value is close to its neighbour's. This can be useful to prevent 'foot-slip' between near-equal hold keyframes.
Béziers
Join or break bézier handles.
Align
Align selected animation curves or keyframes from several attributes to each other or the play head. When aligning left/right, all selected animation curve/keyframes will be aligned to the keyframe furthest left/right. When centre aligning animation curves/keyframes, they will be aligned to the average position of all selected animation curves/keyframes.
Hold Option/Alt to align to the play head (current time).